Design for Additive Manufacturing with Fusion 360
Additive Manufacturing is a very powerful technology that can allow you to quickly make your designs a reality. However, like all manufacturing methods, there are manufacturing constraints of the technology to take into account. Just because you can design something does not necessarily mean you can make it. These constraints will depend in part on the additive technology type and the specific machine that you are using, so it is always best to check the recommendations from the printer manufacturers, but this blog outlines some of the key general points to think about when Designing for Additive Manufacturing, and how you can use Fusion 360 to design your models to account for these.
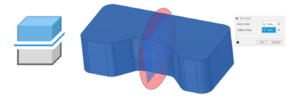
Overhangs
One of the main considerations for an additive build is which faces of the model will need to be supported. For most additive technologies the material will not need to be supported if it is built on top of the previous layer. This means that if building directly upwards usually you will not need supports, and this is also the case when building out at an angle, called the Overhang Angle, up to a certain value. If the overhang angle is too large, usually over 45 degrees, then the material will need to be supported.
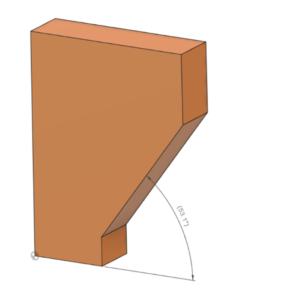
If you want to reduce the number of support structures you are using, perhaps to keep the build time or material use to a minimum, or to reduce the amount of post-processing time involved with removing these supports, it could be necessary to make sure you are not going over the critical overhang angle. When designing using Fusion 360 you can ensure this by defining any sketches that will create an angled face to be less than the critical overhang angle, or when using the Draft tool not adding any draft angles on that are larger than the overhang angle. You can also use the Draft tool to edit the model to decrease the angle of existing faces if necessary. This also works for any imported models.
Features
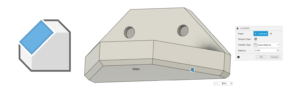
Some types of features will print better than others. Sharp edges or corners should be avoided as these are more susceptible to warping. Instead, fillets should be used where possible. When using Fusion 360 you can use the Fillet tool to easily replace any sharp edges with a rounded fillet.
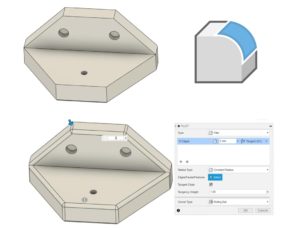
The exception to this rule is if the fillet is curving onto the build plate then instead a chamfer should be used. This is because a fillet is more prone to warping and peeling away from the build plate. You can use the Chamfer tool in Fusion 360 to easily add these in to your model instead. Where necessary it is possible to delete any fillets first, by either selecting the faces from the model or the Fillet item from the Timeline.
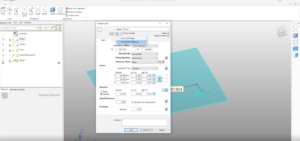
Whole Model Edits
In all methods of additive manufacturing, there will be some form of warping and shrinkage due to the loss of heat from the material. For many models, they may appear to be printed undersize due to this shrinkage. If the fit of your finished part is critical, then you may need to adjust for this shrinkage. One way to do this while using Fusion 360 is to scale your model up to account for the expected shrinking. You can do this using the Scale tool.
To work out the factor to scale your model by, the best thing to do is print a test part, measure some features and make note of the actual printed size versus the nominal CAD model size. From this, you can then work out your scale factor to use for future prints while using the same print parameters. Another factor to consider is the size of your design compared to the size of your build plate. If your model is quite large you may not be able to print it in one go depending on the machine you are using. You may be better breaking the model down into smaller parts and printing these separately. If this needs to be done, Split Body can be a useful tool in Fusion 360. This will allow you to break a body down into separate parts.
This is also a useful method for splitting a model up into separate parts in order to make them easier to print than the original full model would be. These parts can then be assembled after production. For example, if trying to print a sphere this may require high support structure use.
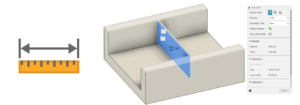
Minimum Detail Size
Although very fine detail on a model might be a nice addition, it may sometimes not be possible to achieve when additively manufacturing it. Depending on the additive technology type, the minimum size of detail that can be reached could be down to the nozzle size of the printer, the layer height, or for example the laser beam width. Whatever this minimum size is controlled by it will vary for each machine, so it is important to know this value for the particular machine you plan to print on.
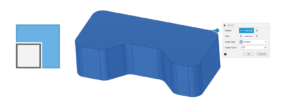
Once you know this value it may be necessary to take it into account when designing a model or cause the need to edit a model. For example, there will be a minimum wall thickness achievable, which will be equal to this minimum detail size. During the design stage in Fusion 360, it could be important to make sure no walls are created below this size, by controlling the dimensions of any sketch items. Alternatively, a model may need to be checked for this which can be done using the Measure tool.
If it is found the wall thickness is too small, using the Press Pull tool is a very effective way of quickly editing surfaces to add (in this case) or remove material.
The same thing goes for other detailed features, such as text or small slots or embossed features. Again, for these the minimum detail size value should be kept in mind when designing with the sketching tools in Fusion 360. Alternatively, the Measure tool is useful again for these types of features, and the Press Pull tool may be useful to edit them if needed. It is also worth remembering that any detail will add time to the build, so it could be best to simply delete these features if they are very fine. Using Fusion 360 it is very easy to simply select faces and delete them, and the material around the faces will be automatically filled in. This deletion itself can then be removed later using the Timeline.

All of the above and more is covered in detail in our Design for Additive Manufacturing 2 day training course. Learn more about topology optimization, existing additive manufacturing technologies, and how to get the best prints from your designs. Contact the Cadspec team to find out more.
Autodesk License Compliancy - it's a pretty big deal
With a growing focus on Autodesk license compliance, ensuring your business stays within its purchased allocation is quite important as failing to do so can incur substantial costs. Autodesk licensing is often ignored – right up until a letter requesting an audit is received. At that point, a large software bill will usually follow. The reason Autodesk licensing is often ignored is mostly down to a lack of knowledge, both about the risk involved and the software in general. The purpose of this blog is to shed some light on Autodesk licensing and provide tips for managing your licenses.
Quite often licensing requirements can simply be misunderstood leading to over-usage, or a business may have updated software/hardware but still have additional non-compliant licenses installed. These are somewhat easy mistakes to make, and we are here to help you avoid doing them!
Can I use a generic login within my Autodesk account?
No- Each Autodesk Account is specific to one individual user. 1 standalone single-user license can only be assigned and used by the user the license is assigned to. Licenses can be reassigned if a user leaves the company or changes role.
Just how many previous versions can I use?
With each Autodesk subscription, you can download previous versions of a software up to 4 years ago. You can only use and install one product version at a time.
Is it possible to over install a product?
Yes. Over installing products is a clear breach of license compliancy.
Am I OK to use trial versions within my organisation?
Yes- A trial version can be obtained for any Autodesk software and used for 30 days. After 30 days the trial will expire and you will have to purchase a license from your reseller to continue to use the product.
Can I use Inventor or Revit just as a viewer?
Yes, but this must be a full license that is assigned correctly.
What happens if I have different legal entities using the same license count?
This is a breach of license compliance.
I received an email or letter about using software licenses on more devices than I am allowed. Why did I receive this communication?
Autodesk monitors software license usage on an ongoing basis, and contacts customers who may not be in compliance with their Terms of Use. If you received this email, their records indicate you are using the license on more devices than your entitlement allows.
What do I do if I received an email about exceeding my Autodesk software entitlements?
You may either purchase an additional subscription(s) equal to the number of additional devices or contact Cadspec/Autodesk for more information. Please follow the instructions in the email to avoid further notifications. (If this email has come from the Autodesk License Compliance team please ensure you get back in contact with them to resolve it)
Can I dispute Autodesk’s findings?
If you believe you are in compliance with your applicable license terms, they can conduct an additional Software Audit that scans your network and all of your computers to detect and verify invalid licenses. This would make it possible for them to identify which machines the software is running on. If you need additional help to resolve this matter, please email them at license.review.uki@autodesk.com.
I have further questions on license compliancy, who should I speak to?
Speak to the Cadspec team if you have any questions in regards to compliancy: info@cadspec.co.uk
Virtual Training Success
Over the past 6-7 months, the UK has had to adapt and change how they do business exponentially. Remote workers, furloughed employees, and a myriad of other obstacles to work around, it hasn’t been easy. In April 2020 Cadspec launched its Virtual Classrooms, allowing customers to still be able to move forward and maintain their competitive advantage with online CAD & CAM training.
How does it work?
The virtual training sessions still feature the same instructors that you would have in one of our training centres but we limit the number of attendees to ensure each one receives the right amount of individual support and attention needed. All of the sessions are carried out online via the ZOOM platform, and after each successful completion of a course, you will receive an Autodesk certificate sent to you digitally.

Customer feedback
We think our online courses are valuable for all staff members but don’t just take our word for it…
I’ve done various courses over the years and this was by far the most enjoyable to date. I found the timing of the course to be spot on and Alex’ attentiveness to questions excellent. The material was delivered in such a way that it was easily digestible and each topic built on the one previous. As far as the subject matter goes, I couldn’t be happier with what I gained from the time spent with Alex. As far as Alex goes, his knowledge of CAD and his ability to deliver this training exceeded my expectations and I would ask that you thank him on my behalf for all the effort he put in.
Shane Fox, Controls Engineer, Animax Ltd
Roy was brilliant again and really helpful in figuring out a way to both link a cloud collaborative model into ours and be able to supersede it for the comparison tool.
Dean Keith, Director, Link MEP
Thanks for organising the course for me. I really enjoyed it, was one the best things I’ve done in a long time. I was thinking of booking on it again in 12 months’ time as a refresher. Stefan was great and really helpful he made the course very relaxed and enjoyable.
Tom Broadbent, Director, MJB Engineering
The course was excellent, interactive and engaging. I learned a lot and it was delivered with high standard. Dave showed a lot of patience with me which made it easier for me to grasp key commands.
Bongani Dlodlo, Proposals Engineer, Bauer Kompressoren UK Ltd
Available Online Courses
Currently, all of our Cadspec courses are available online. Please refer to our training calendar for dates. If you can’t see the date you’re looking for, please don’t hesitate to get in touch. Our trainers do their best to accommodate everyone’s needs as well as they can.
Fusion 360 Promotional Bundle
Bundle Deal 1
- 1 x Fusion 360 Subscription
- 1 x Delegate on Fusion 360 CAD Essentials Training
Annual Price: £825
3 Year Price: £1280
Bundle Deal 2
- 1 x Fusion 360 Subscription
- 1 x Delegate on Fusion 360 CAM Essentials Training
Annual Price: £545
3 Year Price: £920
Bundle Deal 3
- 1 x Fusion 360 Subscription
- 1 x Delegate on Fusion 360 CAD & CAM Essentials Training
Annual Price: £1060
3 Year Price: £1510
Fusion 360 Software Price Only
Annual Price: £219
3 Year Price: £591
T&C’s
This offer cannot be used in conjunction with any other offer that Cadspec or Autodesk are running. All training must be carried out virtually via the Cadspec Online training program. All training course delegates will receive a full manual through the post prior to training commencing. Offer valid until 16/10/2020.
Cadspec FLOW Program Extension
Why extend the FLOW program?
Throughout the past month, many businesses have taken advantage of the Autodesk FLOW program that we assisted with. We have worked with a range of different companies who have expressed their gratitude to these free of charge training offers. We didn’t want to stop there, therefore Cadspec has decided to extend the program personally.
What’s included?
Your training voucher will entitle you to £250 off a scheduled Cadspec training course (these can be found in our online training calendar).
Your vouchers can be used for the following online courses:
- AutoCAD Essentials
- Revit MEP, Architecture
- Civil 3D
- Inventor Essentials
- Inventor Adv Part/Assm
- Powermill
- FeatureCAM
- Powershape
- PowerInspect
How do I apply for a voucher?
Unlike the recent Autodesk FLOW program, with the Cadspec one, you do not need to be on furlough in order to redeem it. There are six vouchers available per company, and they can only be redeemed on the above online courses. To redeem your voucher either call us on 01905 45800 or drop our sales team an email and guarantee your spot on a upcoming course: sales@cadspec.co.uk
Transition to Autodesk Named User

ISO 19650 - all you need to know
ISO19650 PART 1 – Concepts and Principles
In the first webinar, we introduce the high-level concepts & principles seen in the ISO19650 series. We will cover why does the management of information matter, the rationale for ISO 19650, high-level implementation principles, explaining the information requirements & delivery. And introducing Concepts of managing information practically & explaining the National Annex document.
Watch it here ➡️ https://vimeo.com/405877905/5d90bab120
ISO19650 PART 2 – Delivery Phases of the Assets
In this webinar, we will cover the information management processes required when delivering a project to BIM Level 2. This will build on the concepts introduced in our first webinar going in-depth into the common data environment, naming conventions & approval workflow principles. We will look at information requirements in relation to the OIR, AIR, PIR, BEP, AIM & PIM deliverable’s on a BIM Level 2 project.
Watch it here ➡️ https://vimeo.com/405502545/d3d264badc
ISO19650 Video PART 3 – BIM 360 Workflows
In this final webinar, we will focus the Autodesk tools & software to support you meeting A BIM Level 2 or framework project. In managing your Common Data Environment (CDE), controlling user’s access permission, approval workflows for documents & drawings, QA/QC checklists & workflows, coordinating with project stakeholders, design team & clients. As well as meeting asset data requirements and sharing information throughout the design & construction stages of projects.
Watch it here ➡️ https://vimeo.com/409837110/b1899d430d
What's new in Vault & Inventor 2021
Autodesk Inventor 2021 is packed with user-driven updates and enhancements to help you speed up your design workflows, reduce repetitive tasks, and improve experiences so you can focus more time on design and innovation.
Inventor 2021 delivers…
Customer Driven Improvements: Autodesk Inventor 2021 continues to deliver enhancements requested by you and the Inventor user community.
Continued Delivery of Professional Grade Functionality: Autodesk Inventor continues to raise the bar for you to work more productively with your increasingly larger and more complex designs.
Connected and Automated Workflows: Autodesk Inventor 2021 extends AnyCAD functionality for Revit to help manufacturers in the construction industry collaborate and coordinate on BIM projects. Sheet Formats and iLogic make it easier than ever to automate the creation of drawings to your CAD standard in Autodesk Inventor 2021.
Watch the updates video here ➡ https://vimeo.com/408001541/8d21c826ee
_______
Autodesk Vault 2021 continues to deliver on your feedback from live events, Autodesk Ideas, and the Vault Beta community with new customer-driven enhancements and features.
Whether you’re just getting started with Vault, or you’ve relied on it for years, this webinar will help you understand what’s new in Vault 2021.
Here’s a summary of the productivity-boosting functionality you can expect from Vault 2021:
- Smart Duplicate Reduction
- Productivity for CAD Users
- More Efficiency for Administrators
Watch Vault in action here ➡ https://vimeo.com/412712843/8967d5070f
Autodesk CAM Repackaging of PowerMill, PowerShape & PowerInspect
What is included in the new Fusion 360 repackaged offerings?
- Fusion 360 with PowerMill Standard. Included: PowerMill Standard, Fusion 360, Fusion 360 Team, Fusion 360 Machining Extension & HSM Works.
- Fusion 360 with PowerMill Ultimate. Included: PowerMill Ultimate, Fusion 360, Fusion 360 Team, Fusion 360 Machining Extension, Fusion 360 Additive Build Extension & HSM Works.
- Fusion 360 with PowerShape. Included: PowerShape Ultimate, Fusion 360, Fusion 360 Team & HSM Works
- Fusion 360 with PowerInspect. Included: PowerInspect Ultimate, Fusion 360, Fusion 360 Team, Fusion 360 Machining extension & HSM Works.
What is the Fusion 360 – Machining Extension & the Fusion 360 – Additive Build Extension?
The Fusion 360 – Machining extension will be split into two extensions to separate the existing machining and additive capabilities. You will be able to access this technology according to your existing product offering when it becomes available.
Are PowerMill, PowerShape, or PowerInspect an entitlement to Fusion 360?
No. Specific tiers of these products are only available within the four new offerings mentioned in the first question. You cannot subscribe to a standalone version of Fusion 360 and receive an entitlement to any tier of PowerMill, PowerShape, or PowerInspect.
I’m an existing PowerMill/Powershape/PowerInspect subscriber, when will I move to the new offerings?
From September 14th, 2020 existing named user subscribers will be migrated by Autodesk to the equivalent new Fusion 360 with PowerMill/PowerShape/PowerInspect’ offerings.
For further information, check out our video below…
To learn more and talk to our CAM team call 01905 458000 or email info@cadspec.co.uk
PowerInspect Q&A
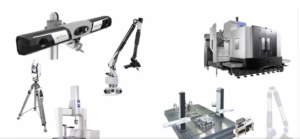
So what is PowerInspect, and how does it differ from the myriad of other metrology software out there in the market?
PowerInspect is one software package that takes control of your form, geometric and GD&T measurement for any device. PowerInspect is designed to work with CMM’s, Articulated Arms, Laser Scanners, and Machine tools fitted with probes. This allows a single software package to take control of your measurement and inspection across various departments. Reducing training times and ensuring consistency. Utilising cloud-based collaboration tools like shared views allow you to share 3D inspection reports internally or externally, allowing multiple stakeholders to instantly gain aces to the data required to make assessments on product quality.
What metrology devices can PowerInspect work with, CMM/White Light/Blue Light?
- CMM: Either native protocol if supported or via I++ standards
- Articulated arms (with scanners attached)
- Scanner blue light
- On machine probing (Post-processors to support most major control types)
Does PowerInspect produce a report at the end of measuring for me?
Yes, you get a comprehensive report via HTML or excel. CAD view images can also be added to the report giving a visual representation of the measurements, not just text-based reporting.
Is the software easy to pick up? If not – what training would you recommend for a first time user of Autodesk PowerInspect?
If users have been using previous inspection software then minimal training will be required. Some form of formal training is recommended to ensure best practice. For further information on PowerInspect training, head over to our training calendar.
What would you say makes PowerInspect stand out from the rest of the software’s in the market?
PowerInspect software offers comprehensive inspection, validation, and quality control management for all your measurement equipment. With ‘On Machine Verification’ capability, production times can be significantly reduced by leveraging existing machine tools for in-process inspection. Guiding line functionality saves time when inspecting complex parts & Shared Views capability ensure stakeholders can access results anytime from an internet-enabled device.
To find out more information about PowerInspect software click here, or to speak to one of our PowerInspect experts please get in touch: 01905 458000 | info@cadspec.co.uk